
Enroll your course’s students and organise them into groups
Every course has its own student list and groups. Here you enroll one student or a whole class, generate codes for those without an account, split them into groups with start dates, and suspend anyone’s access. Every button of both tabs is explained, with examples from a real course.
- About 8 minutes
- 6 steps
Who can do it: Requires the “Enrolments and groups” permission in your role; generating codes also needs “Activation codes”.
 Let Noqta show you
In 6 steps
- 1Open your course, then the Students tab: every enrolled student with their group, status and enrol date.
- 2Enroll a student who has an account by their email with “Add student”, and pick a group if you like.
- 3For a list of students with accounts: “Add in bulk”, then “Link existing accounts”, up to 500 emails at a time.
- 4For students without accounts: generate “Activation codes” and print them; each student scans their card and unlocks the course themselves.
Before you start
- A course already created. Manual enrolment needs no price and no payment method.
- The “Enrolments and groups” permission, plus “Activation codes” if you want to generate codes.
- The account email of each student who has already signed up, or how many students have no account yet.
- If you teach several classes: the groups’ names and start dates.
- Step 1 of 6
The Students tab at a glance
Open the course from Courses, then the Students tab (on a computer, the panel beside the column becomes the course’s tabs, and the course name in the “You are here” path takes you straight to another course’s Students). At the top of the tab are the search “Search by name or phone…” (it searches emails too), the number enrolled, and the “Add in bulk” and “Add student” buttons. Each row shows the name, the phone or email, a “Group” list that changes their group at once (or “No group”), their status (“Active”, “Suspended”, “Expired”, “Pending”) and their enrol date. This tab is for enrolling and organising; each student’s progress, exams and payments live on the main Students page.
On screenStudentsSearch by name or phone…GroupNo groupActiveSuspendedExpiredPendingTipExample: type “Amina” into the search to find Amina Benali, then move her to “Group B — Friday morning” from the list in her row.
- Step 2 of 6
Enroll one student by email
Press “Add student”, type the email of the student’s account, pick a group if the course has groups, then “Enroll”. The result appears under the field: “Student enrolled in the course.” or “This student is already enrolled.”. Enrolling by email links the account of a student who signed up on or bought from your academy; it never creates one: if you see “This address hasn't signed up on your academy yet — ask the student to sign up on your academy's site, then add them, or send them an activation code.”, ask them to sign up at your school’s address with their name, email and a password, then try again; or give them an activation code to unlock the course themselves.
On screenAdd studentGroupNo groupEnrollCancelTipThe student you enroll automatically becomes a student of your school and finds the course in their portal next time they sign in.
Heads-upEvery student with active access takes a place in your plan. If you see “There are not enough available places…”, review active access or request a higher limit.
- Step 3 of 6
A whole class in one go
Press “Add in bulk” to open the “Add a batch of students” panel, and choose “Link existing accounts”. Paste the emails as they are — one per line, comma-separated, or a CSV’s contents — or add a file with “Choose a CSV file”. The panel picks out the addresses, drops duplicates and counts them; choose the group and press “Enrol {count}”, up to 500 addresses at a time. You get a result for every address: “Enrolled”, “Already in”, “Not signed up here”, “Invalid email”, which you can keep with “Download CSV report”.
On screenAdd in bulkAdd a batch of studentsLink existing accountsChoose a CSV fileEnrol 40Download CSV reportUse activation codesTipExample: a class list of 40 emails: 28 enrolled, 1 already in, 11 not signed up here. For those eleven, the “Use activation codes” link takes you straight to codes.
Heads-upLinking by email only adds people who signed up on your academy: anyone else stays outside the course until they sign up on your site or redeem a code.
- Step 4 of 6
Activation codes for students without accounts
In the same panel, choose “Activation codes”: one code per student, unlocking this course, with no email from you and no online payment. Press “Create a batch to print”: the “Batch to print” window opens with this course chosen. Set the “Quantity” (20 by default, up to 500), the “Code price (DA)” (the course’s price is offered; 0 for free cards), the “Card access duration” if the course is a subscription and, if you like, the “Batch name”. Press “Generate 40 codes”: you land on the batch page to print the cards with “Print cards”, or send each code from its row with “Send on WhatsApp”. Each card carries a QR code that opens “Activate your card” at your academy on the student’s phone, the code already filled in: they tap “Activate card” — even if they’re already your student. Someone without an account first lands on “Create your account to activate your card”, with their card above it, “•••• •••• H4TP”: “Your card’s code is kept on this device — it activates by itself as soon as your account is confirmed.”; back in the same browser, they come back to the same code and the card activates by itself; if they confirm their email in another browser, the page says “Scan the card again or type the code.”. Once it opens, they read ““Mathematics — Bac 2026” is open” with their access period, and one button, “Start the first lesson”; you get “… activated their card for “Mathematics — Bac 2026””.
On screenActivation codesCreate a batch to printBatch to printQuantityCode price (DA)Card access durationBatch nameGenerate 40 codesPrint cardsSend on WhatsAppActivate your cardActivate cardCreate your account to activate your cardStart the first lessonTipThe code’s price is required, so the batch’s activations reach the accounts and never hold up the month’s close. An older batch with no price is priced from “Price them” in “Sales” → “Cards”. The batch then sits in “Cards”, under “Printed batches”, with a button that copies each available code. For a single student who pays you on WhatsApp, “Sell a card” in “Cards” (or at the head of “Incoming”) is quicker: one card, which reaches them in a message with the code and the link.
Heads-upGenerating codes needs the “Activation codes” permission, which the teacher role doesn’t have by default. If the course is published with no published lesson yet, the batch popup warns: “No published lesson in this course yet: whoever activates a card walks into an empty course. Publish at least one lesson before handing out cards.” with “Open the curriculum”. And while your academy is being prepared or is frozen, the popup says so first: no cards are sold until it opens.
- Step 5 of 6
Groups: classes with their own dates
In the Groups tab, press “New group”: a “Group name” such as “Group A — Saturday evening”, a “Capacity” (30 by default, up to 1000, empty for no limit) and a “Start date”, then “Create”. The group’s card shows “Starts on…” and its “Enrolled students” out of the capacity. The start date is what the curriculum’s “after group start” unlock rule counts from, and a group is an audience you can pick in “Student notifications” and in Community spaces. To move several students at once, select them in the Students tab and use “Move to group…”.
On screenNew groupGroup nameCapacityStart dateCreateEditDelete groupSelect visible (5)Move to group…TipCapacity guides you, it doesn’t lock: the card shows when a group is full, but it blocks no enrolment and creates no waitlist.
Heads-up“Delete group” doesn’t work on a group that has students: move them out first from the Students tab.
- Step 6 of 6
Status: suspending and unenrolling
“Active” reaches the course. “Suspended” means you suspended them, so they can’t open it until you reactivate them. “Expired” means their access period ended, like a subscription not renewed. “Pending” is an enrolment not yet active. Click “Active” or “Suspended” to switch between them; the student’s progress is kept. “Expired” and “Pending” don’t switch on click. “Unenroll” (the bin icon at the end of the row) removes the student from the course once you confirm. If a change fails, the row goes back to how it was, with a message.
On screenActiveSuspendedExpiredPendingUnenrollTipFor a student behind on a payment, “Suspended” beats unenrolling: you reactivate them with one click and they find their progress where they left it.
Heads-upUnenrolling permanently erases the student’s progress in this course and their lesson notes. If you’ll take them back later, suspend them instead.
After enrolling your students
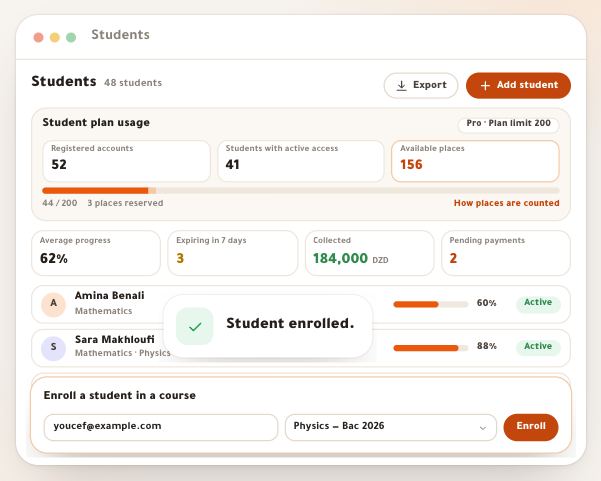
- Follow their progressThe main Students page: each student’s progress, exams and payments, with a group filter.
- Price your codesIn “Cards”, every batch gets its price and you follow its activations.
- Message a group“Student notifications” reach everyone, one course or a single group.
- Open a space for a groupA Community space whose audience is one group, for the class’s questions.
Questions
How do I add a student who has no account?
Enrolling by email doesn’t create accounts. Either the student signs up at your school’s address and you add them by email, or you generate them a code in “Add in bulk” → “Activation codes”: they scan the card, create their account, and the card activates by itself when they come back. Someone who already has an account types the code in “Activate your card” or “Have a code?” on your platform.
A student scanned the card before creating an account. Is the code lost?
No. The code stays on their phone for half an hour while they create their account, and never travels in the confirmation email. If they open the confirmation link in the same browser, they come back to “Activate your card” and the card activates by itself, once; in another browser or after half an hour, the page says “Scan the card again or type the code.”. Under the card, “It will be activated on …’s account” with “Not you? Switch account”: on a family phone, it doesn’t go onto someone else’s account.
Can I import an Excel file?
Save it as CSV and pick it with “Choose a CSV file”, or copy the email column and paste it. The panel catches every email address in the text, up to 500 at a time.
What’s the difference between “Suspended” and “Unenroll”?
A suspended student stays on the list with their progress and can’t open the course until you reactivate them with a click. Unenrolling removes them from the course and erases their progress in it for good.
Does a group’s capacity block one more enrolment?
No. Capacity is a guide: the group’s card shows it’s full, without blocking enrolment or creating a waitlist.
Why can’t I delete a group?
Because it has students. Select them in the Students tab and move them with “Move to group…” to another group or “No group”, then delete it.
Where do I see a student’s progress in the course?
On the main Students page in the “Academy” panel: open the student to see their progress in each course, their exams and their payments.
Why does it say “There are not enough available places”?
Every student with active access takes a place in your school’s plan. Suspend those who no longer study, or press “Plan” on the “Places” card of the main Students page to raise the limit.