
How to create a course on Dirassa+
Three short stops and your course is ready for its first lesson, whatever you teach: maths, photography, code, crafts or fitness. Every field is explained here, along with what happens after “Create course”.
- About 3 minutes
- 6 steps
Who can do it: Needs the permission to create courses in your role in the workspace.
 Let Noqta show you
In 6 steps
- 1Open “Courses” and press “New course”; the create page opens full screen.
- 2In “What will you teach?”, write the “Course name”, and the “What will your student be able to do after?” line if you like; or choose “Let Noqta build it”.
- 3Under the name, one line holds the field and level, from your answers when you created the academy or from the course name; press “Change” if it isn’t right.
- 4In “How do you teach it, and for how much?”, choose “How it’s taught”, “Where?” for in-person and hybrid, then the “Price”, with how your students will pay under it.
Before you start
- The permission to create courses in your role; without it the “New course” button doesn’t show.
- A course name: the only required field, two characters at least.
- One sentence about what your student will be able to do afterwards: shoot product photos on a phone, build a first website, sew a piece on their own, or speak to an audience with confidence.
- No cover image needed now: the course starts with an automatic cover in its field’s colour, which you change in “Settings & pricing” whenever you like.
- An idea of the price and payment model that suits your students; under the price, a line says how they will pay.
- Step 1 of 6
Open the courses page
From the “Academy” panel beside the column, open “Courses”. All your courses are here with their status, students and price. Press “New course” (or “+” at the head of the panel, then “New course”, from any academy page): the create page opens full screen and covers the whole dashboard. At the top there is a single bar with the close button and its name, “New course”, the three stops that show where you are, and the save status. Beside “New course”, “Let Noqta build it” opens the same page with Noqta ready to build it with you.
On screenCoursesNew courseLet Noqta build itTipOn a phone, the “+” in the bottom bar opens “New course”. In an academy with no courses yet, two cards let you choose: “Let Noqta build it” or “Build it myself”. To leave the create page press the close button, “Close — your draft is kept”.
- Step 2 of 6
What will you teach?
At the top of the first stop there is one choice: “Build it myself” or “Let Noqta build it”. Yourself: write the “Course name”, a name a student understands at a glance, like “Year 3 maths — functions”, “Python for beginners”, “Sewing step by step” or “TikTok ads that sell”. Then, if you like, answer “What will your student be able to do after?” in one line shown under the course name. On the tinted surface your course card takes shape “What your student sees” with every letter you type, in its automatic cover. Then press “Next: Format & price”.
On screenBuild it myselfLet Noqta build itWhat will you teach?Course nameWhat will your student be able to do after?optionalWhat your student seesNext: Format & priceTipWith “Let Noqta build it” you describe your course in one sentence under “What will you teach, and to whom?”, adjust the sentence below it — “About 3 chapters of 3 lessons…” — then “Build it”: Noqta writes the name, the line, the chapters and the lessons on the same page; you review them and press “Create the course”. If she can’t build, “Continue myself” takes you back to the stops with your idea as the name.
Heads-up“Next” only moves on once the name has at least two characters; the message “Write at least two characters” shows under the field.
- Step 3 of 6
Field and level: one line
Under the name, one line gives the field, the topic and the level, such as “Field: School · Mathematics · Level: Secondary school”. For your first course in the academy it is filled from your answers when you created it, and says so underneath: “From your answers when you created the academy”; otherwise the field is suggested from your course name: “Suggested from the course name”. With nothing to suggest, it reads “Field and level not set yet” with “Set them”. “Change” opens it in place: the “Field”, one of eight (school, languages, code & tech, design & photo, marketing & business, health & fitness, arts & crafts, personal growth), then the “Topic” from the chips or “Another topic”, and the “Level”: beginner, intermediate, advanced, all levels, or “Another level” — school-level chips when the field is “School”. Then “Done”.
On screenFrom your answers when you created the academySuggested from the course nameField and level not set yetSet themChangeFieldSomething elseTopicAnother topicLevelAnother levelDoneTipIf your field is missing, choose “Something else” and write its “Field name” — “Music”, “Driving”; “Icon and colour” gives it a mark and a colour from a ready list, which your cover is drawn with. The field is kept and offered again among the chips for your next courses.
- Step 4 of 6
Format and price
Choose “How it’s taught” in a bar of three, with a line below explaining your choice: “Online”, every lesson on the platform; “In person”, you meet in a place and the platform handles sign-up and follow-up; or “Hybrid”, in-person sessions with lessons on the platform. For in-person and hybrid, “Where?” appears: the wilaya and the place, both optional, shown to students next to how it’s taught. Then the “Price”: “Free” for everyone who enrols, “One price” with one payment and permanent access, “Instalments” split over payments, or a “Subscription” monthly, yearly or for a set period. The four models form a two-by-two grid, each with its line; under it come its fields, each with its name, then “Students see:” and the price as they will read it. At the foot of the card a line says how your students will pay, such as “Students pay with: CCP / Algérie Poste · BaridiMob”, with “Manage”. Then “Next: Curriculum”.
On screenHow do you teach it, and for how much?How it’s taughtOnlineIn personHybridWhere?WilayaPriceFreeOne priceInstalmentsSubscriptionStudents see:ManageNext: CurriculumTipThe course starts on “One price” at 2,500 DZD. If you switch to “Instalments” the same amount becomes the “Full amount”, with “Number of payments” 3 and “Every how many days?” 30, and a line under them splitting it — for 9,000 DZD: “3 × 3,000 DZD · every 30 days — the first one at enrollment”. Each model keeps its numbers if you try another and come back, and you can change the model later in “Settings & pricing”.
Heads-upIf the line says “No payment method is ready: students won’t be able to pay.”, set one up from “Manage” before you publish; if you don’t, “Publish course” asks you first in the “Your students can’t pay yet” popup. In a school, the “School price rules” show before you type a price, such as “Price between … and …” or “The price you enter is a proposal the director approves at review.”.
- Step 5 of 6
Your curriculum
The last stop has two choices. “Suggested plan”: Noqta writes 3 chapters of 3 lessons from your course name. While it is being written the button reads “Writing the plan…” and can’t be pressed — a course is never created without its plan — with “Create it empty, without the plan” if you’d rather not wait. Once it’s there you rename in place, add, delete and move chapters with the arrows, or “Suggest another”, then “Create the course with this plan”, followed by the number of chapters and lessons. Or “Start empty”: a first chapter with one lesson, which you name in “First lesson’s title” if you like, then “Create course”. In “What your student sees” you see your course card and, under it, what happens after creating; on a narrow screen the “Preview” button opens it.
On screenYour curriculumSuggested planStart emptyWriting the plan…Create it empty, without the planSuggest anotherAdd a chapterCreate the course with this planFirst lesson’s titleCreate coursePreviewTipThe plan’s lessons are created as drafts students don’t see until you write and publish them. To show their titles now, tick “Show their titles to students as “Coming soon””.
Heads-up“Suggested plan” is limited to 10 suggestions a day per workspace, one that fails isn’t counted, and “Suggestions left today” shows what remains. Nothing is saved to your account before “Create course”: your draft stays on your device.
- Step 6 of 6
After creating: the first lesson
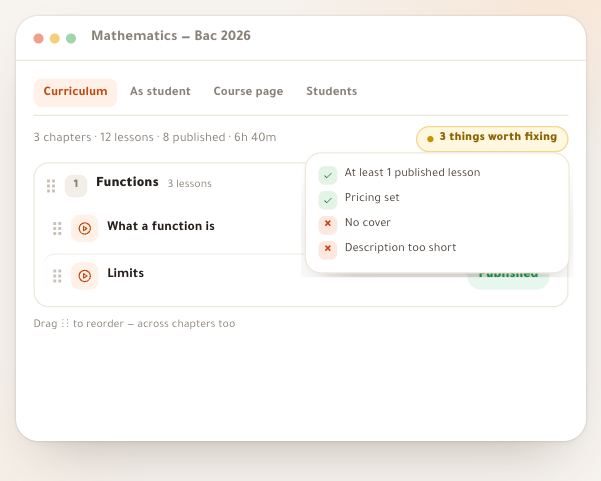
You land on your course page, and a course page for students was created automatically. The header reads “Draft” with the “Publish course” button; in the “Curriculum” tab, above your chapters, one card: ““Phone photography from scratch” is created” and “A draft nobody sees until you publish. Next: write the first lesson.”, with one orange button that opens the first lesson in the editor, by its name: “Write “Window light””. If you started empty, your curriculum is “Chapter 1” with “First lesson” (or the title you wrote), and the button reads “Write “First lesson””. Write the lesson — one video or one paragraph is enough — and publish it: the editor’s publish panel says “The lesson is ready. Publish the course so your students can see it.”, with “Publish the course”, which publishes it right there. Or go back to the course page: the card says “Your course is ready to publish.” and “Publish course” becomes the orange button; press it to open enrollment, and the button turns into “Published”.
On screenDraftPublish courseCurriculumWrite “…”Chapter 1First lessonThe lesson is ready. Publish the course so your students can see it.Publish the courseYour course is ready to publish.PublishedTip“Marketing post” and “Linked task” above the curriculum wait for the first published lesson: a course nobody can open yet has nothing to advertise. If you write several lessons before publishing any, the card later offers “Publish the ready lessons” to publish the ready ones together.
Heads-upIf the plan you chose couldn’t be written, the card says “The plan you chose wasn’t written (3 chapters, 9 lessons).” with “Try again”: it is written from the copy kept on your device. On another device, start your curriculum with “Add a chapter”.
After creating
- Build the curriculumChapters and lessons you reorder by dragging or with arrows in “Curriculum”.
- Write the lessonsText, video, images, maths and questions in one editor.
- Papers and examsPapers with your questions, grading and results, in “Papers”.
- Open enrollmentPress “Publish course” when you’re ready.
Questions
The “New course” button doesn’t show. Why?
Creating courses needs the matching permission in your role in the workspace, and the button doesn’t show without it. Someone who opens the creation page directly sees “You don’t have permission to create courses”. Ask the workspace owner or whoever manages roles.
I press “Next” and nothing happens. Why?
The “Course name” needs at least two characters, and the message “Write at least two characters” shows under the field. The other fields across the three stops are optional.
Do I lose what I wrote if I close the page?
No. Nothing is saved to your account before “Create course”, but your answers are kept on your device after every change, as long as the course has a name, and the bar says “Kept on your device”. When you come back to “New course”, your draft opens on the stop where you left it, with “Picked up where you left off: “…”” and “Start another course”. The draft is yours alone, in this workspace and on this device: someone sharing the device doesn’t see it, and it doesn’t show in another workspace.
My field isn’t in the list. What do I do?
Press “Change” under the name, then “Something else”, and write your field’s name, like “Music”, “Driving” or “Pharmacy”; “Icon and colour” gives it a mark and a colour. The cover is drawn with them, and the field is kept: it is offered again among the chips when you create your next courses.
What is “Let Noqta build it”, and how many chapters does she write?
You describe your course in one sentence, and Noqta builds the name, the line, the field, the chapters and the lessons on the same page. The size is set in the sentence under your description — “About 3 chapters of 3 lessons”, from 2 to 4 — along with the level, how it’s taught and the price (Noqta suggests it, free, or an amount you pick; a suggested price stays within the platform’s limits). You review everything under “Your course is ready”, then “Create the course”; “Edit the settings” takes you to the stops, and if she can’t build, “Continue myself” puts your idea in the name.
How many times can I ask for a “Suggested plan”, and what does it create?
10 suggestions a day per workspace; one that fails isn’t counted, and “Suggestions left today” shows what remains. Noqta drafts 3 chapters of 3 lessons from your course name, and you edit them before creating. On creation the chapters and lessons are written with the course, the lessons as drafts students don’t see — marked “Coming soon” only if you ticked it.
What if the network drops at “Create course”?
The message “The connection dropped before the answer came. Try again: if the course was created, it’s the one that opens — never a second.” shows and the button comes back. Each draft has one id, so trying again never creates a second course.
Is the course visible to students as soon as it’s created?
No. The course is saved as a draft with enrollment closed, and a course page is created that you edit in the “Course page” tab. Enrollment opens when you press “Publish course”; if no lesson is published yet, a “Before publishing” popup asks you first.
Can I change my choices after creating?
Yes. Name, topic, level, description, how it’s taught, price and cover are all edited in the “Settings & pricing” tab of the course page.
Where do I choose the course cover?
Not while creating: the course starts with an automatic cover in its field’s colour and mark, which you see in “What your student sees”. You change it afterwards in “Settings & pricing”, under “Cover”: an image from your device (JPG, PNG or WebP up to 15 MB, 2:1 recommended) or another shade of the automatic cover.
I don’t see the “Price” on the second stop. Why?
The price is set by a member allowed to “Publish and price courses”. Without that permission the stop is called “How do you teach it?”, the course starts as a draft with no price, and whoever publishes it sets the price before publishing.
Is the platform only for school teaching?
No. Nine fields, including photography, code, languages, marketing, fitness and crafts, and the topic and level are free text. School levels only show when the field is “School”.
Can I create a free course?
Yes. Choose “Free” under “Price”; it’s open to everyone who enrols.